OpenOffice.org Calc Tips : drag & drop in a chart
Björn Milcke from Sun made me discover today a nice feature of the chart module : using drag & drop with charts. Have a look at the following picture :
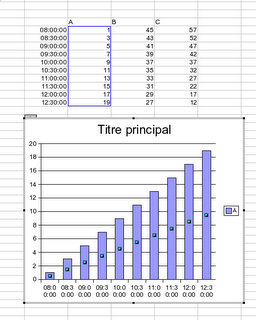 I would like to create a diagram displaying the three ranges A to C. As you may notice, I forgot to select the ranges B and C. So what will I do ? I will just select the two ranges B and C, and then drag & drop them on the chart using the "ctrl key". This will add directly my two ranges to the chart ! Nice, isn't it ?
PS : to drag & drop the range, you first need to select it, and then click on it for some time before moving your mouse. This is the same behaviour as to move cells around a sheet.
PS 2 : if the ranges do not have the same number of values, the result is... weird. but this will be corrected in some time ;-)
I would like to create a diagram displaying the three ranges A to C. As you may notice, I forgot to select the ranges B and C. So what will I do ? I will just select the two ranges B and C, and then drag & drop them on the chart using the "ctrl key". This will add directly my two ranges to the chart ! Nice, isn't it ?
PS : to drag & drop the range, you first need to select it, and then click on it for some time before moving your mouse. This is the same behaviour as to move cells around a sheet.
PS 2 : if the ranges do not have the same number of values, the result is... weird. but this will be corrected in some time ;-)
 I would like to create a diagram displaying the three ranges A to C. As you may notice, I forgot to select the ranges B and C. So what will I do ? I will just select the two ranges B and C, and then drag & drop them on the chart using the "ctrl key". This will add directly my two ranges to the chart ! Nice, isn't it ?
PS : to drag & drop the range, you first need to select it, and then click on it for some time before moving your mouse. This is the same behaviour as to move cells around a sheet.
PS 2 : if the ranges do not have the same number of values, the result is... weird. but this will be corrected in some time ;-)
I would like to create a diagram displaying the three ranges A to C. As you may notice, I forgot to select the ranges B and C. So what will I do ? I will just select the two ranges B and C, and then drag & drop them on the chart using the "ctrl key". This will add directly my two ranges to the chart ! Nice, isn't it ?
PS : to drag & drop the range, you first need to select it, and then click on it for some time before moving your mouse. This is the same behaviour as to move cells around a sheet.
PS 2 : if the ranges do not have the same number of values, the result is... weird. but this will be corrected in some time ;-)Labels: Calc, OpenOffice.org, Tips, tricks
posted by pagalmes at
1:55 PM
|
0 comments
![]()


